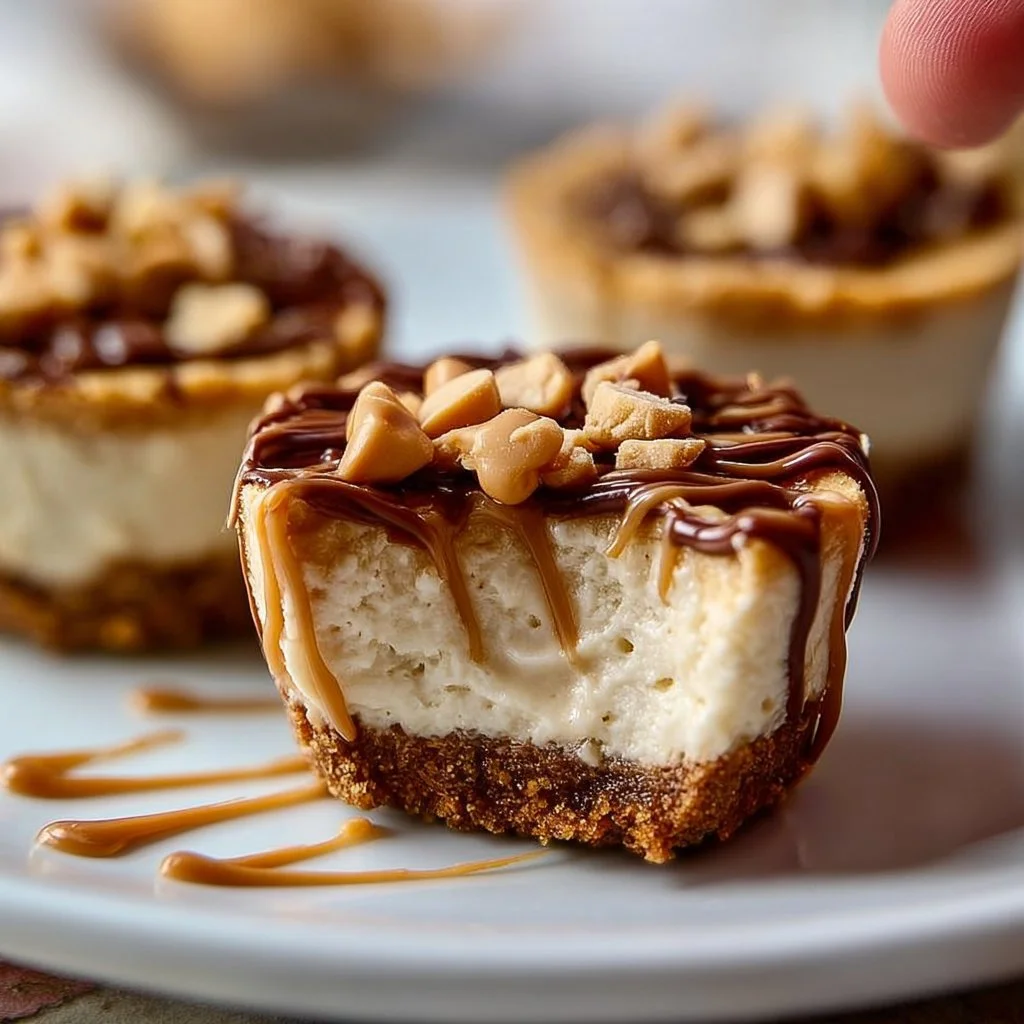
Peanut Butter Cottage Cheese Cheesecake Cups: A Sweet Journey of Flavor
There’s something nostalgic about digging into a dessert that transports you back to your childhood, isn’t there? I can still remember the joy of sharing cheesecake with my family at special gatherings, each bite bursting with creamy goodness. This Peanut Butter Cottage Cheese Cheesecake Cups recipe evokes that warm, fuzzy feeling — but with a delightful twist! The fresh addition of cottage cheese gives it a unique, protein-packed texture while still satisfying those sweet cravings. Let’s dive in and create these delightful cups that are perfect for any occasion!
What Makes This Recipe Special
The charm of these cheesecake cups lies in their unexpected ingredient blend. Combining the creaminess of cottage cheese with the rich, nutty flavor of peanut butter creates a luscious filling that’s indulgent yet surprisingly healthy. Not to mention, they come together in under an hour, making them an ideal dessert for busy weeknights or last-minute guests. With minimal fuss, you can serve up something truly special!
Ingredients
For the cheesecake cups:
- 1 cup cottage cheese (low-fat or full-fat)
- 1/2 cup creamy peanut butter (or almond butter for a twist)
- 1/3 cup honey or maple syrup (adjust to taste)
- 1 teaspoon vanilla extract
- 1 tablespoon lemon juice
- 1 tablespoon cornstarch (optional, for firmer texture)
For the crust:
- 1 cup crushed graham crackers (or gluten-free alternative)
- 1/4 cup melted butter (or coconut oil)
- 2 tablespoons brown sugar (omit for a lower-sugar version)
Optional toppings:
- Chocolate shavings
- Chopped peanuts
- Whipped cream
How to Make Peanut Butter Cottage Cheese Cheesecake Cups
Grab your favorite mixing bowl, and let’s get started! First, preheat your oven to 350°F (175°C). While that’s heating up, you can prepare your crust. Combine the crushed graham crackers, melted butter, and brown sugar in a bowl. Mix until it resembles wet sand — this will help it hold together. Press this mixture into the bottom of your cup or muffin tin for a delightful crunch.
Now onto the filling! In a blender or food processor, blend the cottage cheese until smooth. Then, add in the creamy peanut butter, honey or maple syrup, vanilla extract, and lemon juice. Blend until everything comes together into a creamy cloud of yum. If you prefer a firmer texture, toss in a tablespoon of cornstarch and give it one last whirl.
Once your crusts are ready, pour the filling over the top, filling each cup about 3/4 full. Bake these for around 20-25 minutes until they’re just set. They may jiggle slightly, but that’s perfectly fine; they’ll firm up a bit once they cool. Let them cool at room temperature, then refrigerate for at least an hour before serving.
Serving Suggestions
For a Family Treat:
These cheesecake cups make a hearty dessert after Sunday dinner. Pair them with a scoop of vanilla ice cream and a sprinkle of crushed peanuts for a fun family indulgence.
For a Brunch Gathering:
Serve them in small mason jars! Top with whipped cream and a drizzle of chocolate sauce. They’re the perfect sweet bite to complement your coffee and freshly baked pastries.
For a Quick Snack:
Store these tasty treats in your fridge for a quick grab-and-go snack. They are perfect for those post-workout cravings or a midday pick-me-up!
Tips and Variations
-
Flavor Twists: Switch up the nut butters! Almond or cashew butter provides a nice change. You can even use sunflower seed butter for a nut-free version.
-
Vegan Option: Substitute the honey with maple syrup or agave syrup and use a plant-based yogurt for a creamy vegan twist.
-
Add Extra Texture: Fold in mini chocolate chips or crushed pretzels to the filling for an added crunch.
-
Dairy-Free Alternative: Swap cottage cheese for a dairy-free cream cheese alternative or silken tofu.
FAQ
1. Can I use a different crust?
Absolutely! You can use crushed Oreo cookies, nuts, or even a simple almond flour crust for a gluten-free option.
2. How long will these keep?
They stay fresh in the fridge for about 4-5 days. Just make sure they are covered well to prevent them from drying out.
3. Can I freeze these?
Yes! These cheesecake cups freeze beautifully. Simply wrap them well in plastic wrap and store them in an airtight container. Thaw in the refrigerator before enjoying.
4. What if I don’t have cornstarch?
No worries! You can leave it out. The cheesecake cups will still be delicious, just a tad creamier!
Behind The Scenes
Developing this recipe was a fun adventure! I wanted to create something that resonated with my childhood cheesecake memories, but I also knew I wanted to incorporate a healthier spin. The first few trials were a bit too dense, but once I fine-tuned the cottage cheese ratio, the texture was spot on! I couldn’t believe how creamy they turned out, and I might have eaten more than my fair share during testing — they’re just that good!
Final Thoughts
These Peanut Butter Cottage Cheese Cheesecake Cups can elevate any occasion, from cozy family dinners to elegant brunches. Imagine serving them at your next gathering, everyone talking about how such a beautiful treat could also be good for you. Pair them with fresh berries or enjoy them simply on their own — the possibilities are endless!
I’m excited for you to give this recipe a go. Who knows, it might just become your next go-to dessert! Let me know how yours turns out.

Peanut Butter Cottage Cheese Cheesecake Cups
Ingredients
Method
- Preheat your oven to 350°F (175°C).
- In a bowl, combine the crushed graham crackers, melted butter, and brown sugar. Mix until it resembles wet sand.
- Press the crust mixture into the bottom of your cup or muffin tin.
- In a blender or food processor, blend the cottage cheese until smooth.
- Add the creamy peanut butter, honey or maple syrup, vanilla extract, and lemon juice. Blend until combined.
- If needed for a firmer texture, add a tablespoon of cornstarch and blend again.
- Pour the filling over the crust in each cup, filling about 3/4 full.
- Bake for 20-25 minutes until just set; they may jiggle slightly.
- Let cool at room temperature, then refrigerate for at least an hour before serving.


